|
Website Currently in Beta Contact Us with any issues!
Starter Guide to Painting Miniatures
11
Oct
Hey there, Gamer!
Have you ever wanted to start painting miniatures, but weren’t sure where to start? The miniature market is a huge one, and it can be daunting trying to decide the best way to dive into such a widely varied hobby. And when you can easily spend upwards of eighty dollars on supplies to build and paint one Warhammer 40K Space Marine Squad, what do you do if you decide miniature painting isn’t for you?
Fret not, my friend! I’m here to share with you the quickest and easiest (not to mention cost-effective) way to jump right into miniature painting using some WizKids / D&D unpainted miniatures and D&D Nolzur’s Marvelous Pigments paint sets. These models are already assembled and primed, so no painstaking cutting and gluing required! There are also many models to choose from, including adventurer models, monsters, and decorative set pieces. And each paint kit comes with a variety of colors and a paintbrush. All you need is a little bit of a creative spirit, and you can be well on your way to starting a new hobby.
So whether you want to have some awesome terrain pieces for your D&D campaign or you just want to dabble in the dark art of miniature painting, I’m here to share my experience with these simple steps. Let’s get started!
Step One: Pick your WizKid / D&D Nolzur’s Marvelous Miniatures models(s)
This might honestly be the hardest step of them all, if only because there are so many options to choose from. If you are new to painting, pick a simpler model. If you’re up for a challenge, pick a more detailed model. Either way, choose a model that seems interesting and that speaks to you. Perhaps it’s a super weird looking monster, or maybe you want to paint your favorite tabletop RPG character. Whatever you choose, take a moment to envision how you might want your miniature to look like when it’s finished.
Step Two: Pick your D&D Nolzur’s Marvelous Pigments paint kit
At the moment there are a few different options for paint kits, with more set to be released in November of 2020. Make sure the paint kit you purchase matches the color scheme you’d like to use for your model. If you’re painting a halfling rogue, maybe choose the D&D Adventurer’s paint kit. If you’re painting a Beholder, go for the Monster paint kit. Each paint kit comes with a medium-sized paintbrush. These are fine for pretty much anything you would need to work on, but they can get a little tedious at times. I would highly recommend getting a second paintbrush, but this is entirely optional. A larger brush would be best for models with lots of space that would be painted all the same color. A smaller brush would be better for models with lots of fine detail.
If you decide that you just have to have a color that isn’t included in your kit, feel free to add it to your purchase as well. It’s your mini, after all! Go as crazy as you want!
Also, you want to make sure you have some sort of paint palette. You don’t have to get fancy here; I’ve used the lid from a chip can as a paint palette and it worked fine. BONUS: the chips make great painting fuel to feed your inner creative.
I wanted to give myself a bit of a challenge, so I opted to paint my miniatures with only the brush and paints provided. I did add one super secret miniature painting hack to make my Iron Maiden look even better, and I’ll share that tip when we get there.

Step Three: Clean, Cut, Build, and Prime your models
Just kidding! If you got one of the primed models, you don’t have to worry about any of this. Your mini is ready for painting right out of the box!
Step Four: Paint!
You don’t have to be an expert painter. I’m certainly not, as my photos will show. Just have fun with it.
To start with, I wanted to make sure that the D&D paints had good coverage and were overall easy to work with. I started with the Iron Maiden model, and I’ll be honest and say I just slapped some paint around to see what would stick and how well. Since the paints in each kit are produced by Army Painter, I wasn’t at all surprised to find that they were good quality. The kit I purchased had a nice silver metallic paint, though there were no washes included. Some Abyssal Black and Mithral Silver on the Iron Maiden, and it was already mostly done!

I was surprised to see that the metallic Mithral Silver covered up the Abyssal Black nicely. Some touching up, and this model will look fine.
I finished the Iron Maiden up with some Dragonfire Red on the inside to give it a bit of a bloody look. Here’s my super secret painting hack: you can use part of a clean sponge or foam paintbrush to give your mini a nice blood splatter look. Just dip the foam into the paint and dab the excess off onto a napkin or a clean section of your palette. Too much paint will make the effect look lumpy, but if you get just the right amount you can give your mini some extra wow. You can use this trick with other colors to mimic mud splatter or anything else.

The blood splatter look on the inside was fun and easy to do.
For the Adventurer mini, I decided to paint a Dragonborn Fighter. The picture of the supplies and miniature above includes a Dragonborn Sorcerer, but I changed my mind and went with a Fighter instead. I was also more careful when painting this model. I wanted to figure out how well the paints could blend together to create new shades and how well the provided paintbrush worked on details.
I started by painting my Fighter’s flaming sword. This was pretty fun! The model’s sword is made from clear plastic, rather than grey, and I had never painted something like that before. Perhaps I did this wrong, but the effect is still really nice, so I don’t mind. Some Dragonfire Red for the base of the fire, then a layer of orange (created by mixing a bit of red and a bit of yellow) for the heart of the flames, and then finish it all up with a light layer of Angelic Yellow. These paints blended well, and I’m very pleased with how this sword turned out.

I was able to easily blend the paints in my kit to make new shades, and it made this flaming sword look amazing.
The rest of the model was painted fairly quickly. I used Treant Green for the Dragonborn’s scales and Kraken Blue for his clothing. I did have some issues with my blue paint separating, meaning the different pigments that were used to create the color were no longer staying mixed in the media properly. The only way to fix this is to shake the paint bottle like crazy, and this eventually helped to even out the color. If you decide that you want to make miniature painting a permanent hobby, investing in some paint mixing balls might be a good way to extend the life of some of your older or more stubborn paints. Just drop a few of the stainless steel ball bearings into the paint pot, and they’ll help to mix everything when you shake the bottle.
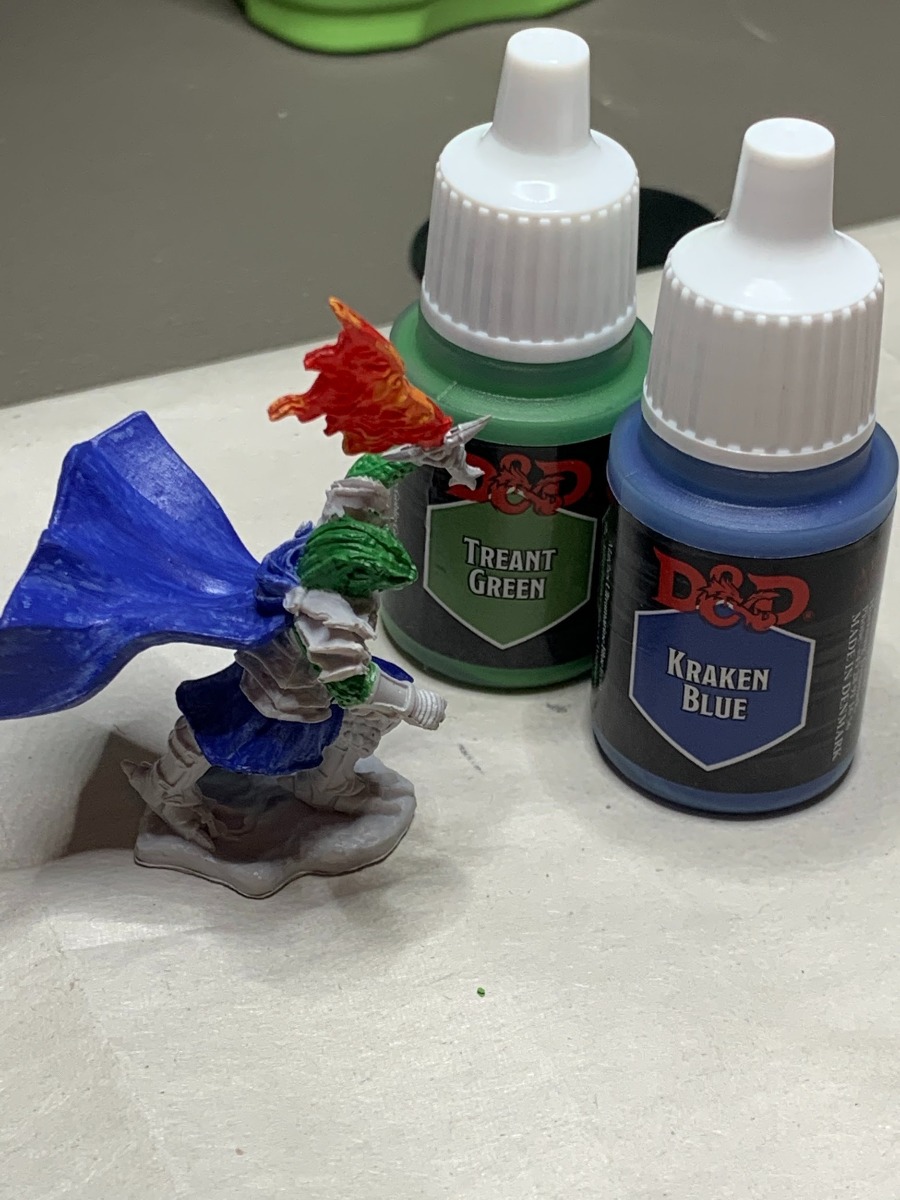
Some Kraken Blue and Treant Green help to bring this model to life.
I finished this model out with some Mithral Silver for the armor, a bit of Bugbear Brown for the straps on the greaves and the gloves, and a quick dash of Dragonfire Red for the eyes and a small gem detail on the hilt of the sword. For the base, I mixed a bit of Abyssal Black into some Bugbear Brown paint to get a nice mud color. For the claws on the Dragonborn’s feet, I mixed just a touch of Bugbear Brown in with some Lawful White paint to get a bit of a dirty bone color. If I were to paint this model again, I would paint the hands the same color as the scales and skip trying to make it look like he’s wearing gloves.
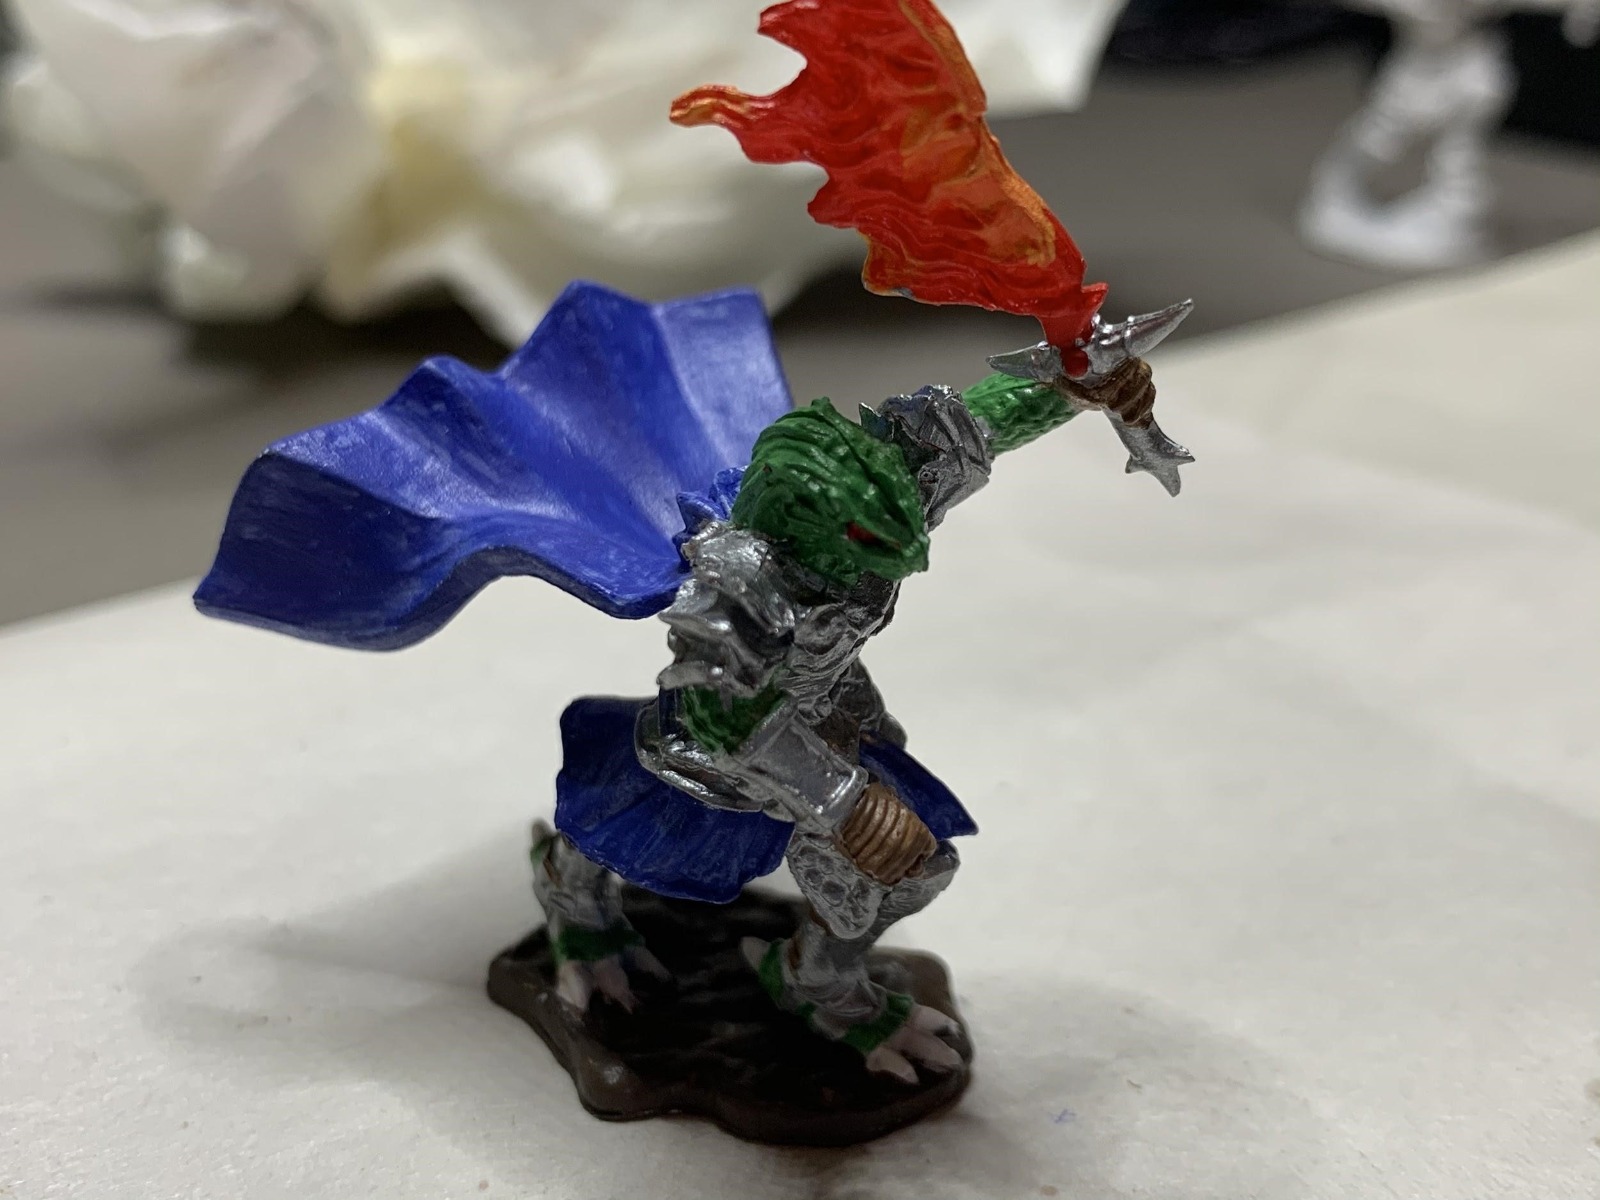
The finished Dragonborn Fighter model. You can see some of the uneven hues on his cape from the blue paint not mixing well.
Overall, I’m quite pleased with how these models turned out. Since the D&D painting kits don’t include shades or effect paints, these models don’t quite have a finished look to them. However, for the beginning hobbyist or a GM with a desire to liven his or her campaign a bit, the Nolzur’s Marvelous Pigment kits and WizKids or D&D Nolzur’s Marvelous Miniatures are a perfect choice.
I hope this has been helpful, and if you want to give miniature painting a try I would highly recommend starting with Nolzur’s Marvelous Miniatures and Nolzur’s Marvelous Pigments paint kits.
Good luck and Game On!

Jacklyn Hennion
Blog Writer
Jacklyn Hennion is a fantasy writer and an avid lover of sweets and wine. She enjoys Netflix and video games. She has a variety of creative hobbies, including miniature painting and crochet. She and her husband live in Norman, Oklahoma with their cat, Chansey. Her first novel, The Book of Death, was published October, 2020. Follow her blog at JacklynHennionAuthor.com for news on upcoming publications and book reviews....
Recent Posts
-
Lance Price Fellowship Award
 April 8, 2024
 -
Lance Price Fellowship
 December 27, 2022
 -
Cutthroat Caverns: The Best of Frenemies
 February 5, 2021
 -
Through the Gateway and Beyond
 January 21, 2021
 -
The Elder Scrolls: Call to Arms Review
 January 19, 2021