Toggle Nav

Intermediate Painting Guide
August 06, 2024
Intermediate Painting Guide With Modiphius's The Elder Scrolls Call to Arms Models
Hey there, Gamer!
In my last article, I walked you through the steps of developing a new hobby in miniature painting. We used pre-primed models from WizKids and D&D’s line of ready-to-paint figures to make sure we could hit the ground running. We cut investment costs by only buying the bare necessities for the absolutely new hobbyist. And when we finished, we had some pretty awesome pieces that I hope we can all be proud of.
But what if you’re ready to level up your miniature painting game? Or what if you’ve already mastered the basics, and my last article was only a nice refresher course? Where does that leave you, my excited and talented friend?
Once again, fret not! I’m here to help you scale your miniature painting hobby up and advance your painting skills. We’ll go over how to build and prepare your model for painting, and I’ll show you some more advanced painting techniques that will help to give your finished model a really polished look. For today’s lesson, young Padawan, we’ll be turning to Modiphius’s new(ish) miniature game- The Elder Scrolls: Call to Arms.
Step One: Pick your model
Remember my helpful step-by-step guide that I shared with you last time? Well, the steps haven’t changed. We’re just exploring some of them more thoroughly.
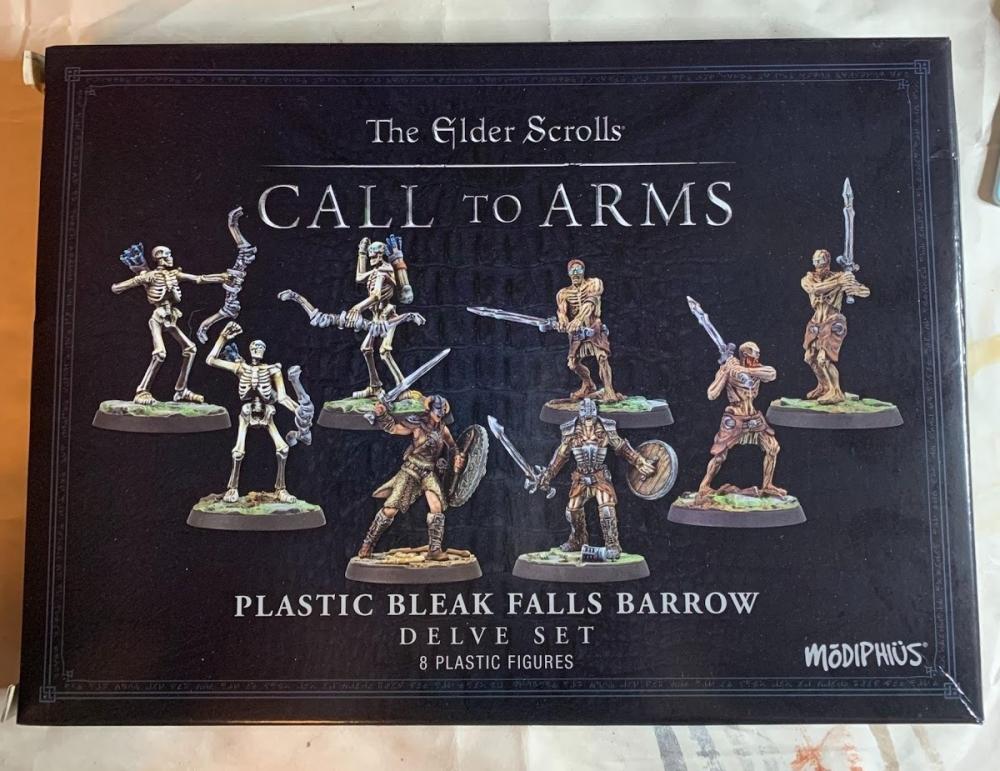
For this adventure, I’ll be painting the Dragonborn and the Draugr Deathlord from the Call to Arms Bleak Falls Barrow Delve starter set. Feel free to pick whichever model you would like! Just be sure to adjust your paint and brush options as needed in the steps below.
Step Two: Pick your paints and any additional brushes you may need
In addition to the basic paints we used for the beginner’s painting guide, you’re going to also need a few additional ones.
First, pick a good primer. This can be either a paint-on primer or a spray-on primer. And as long as you get a primer that is specifically made for models, you can get whatever brand you’d like. For this guide, I’ll be using The Army Painter’s Skeleton Bone and Matt Black spray-on primers. If you only want to get one primer, I’d recommend going with grey or black for anything that will have a lot of darker colors and white for anything you plan on painting with lighter colors.
You can also get primers that are used with an airbrush, but we’ll consider that a pro-level skill and leave that for a later date.
Second, grab any additional paints you might need. Again, you can pick any brand you’d like, so long as the paint is designed for miniature painting. There will surely come a day when you find two of the perfect shades for your current project and they’ll be in two different brands. No big deal. Grab them both and get to painting!
I would highly recommend getting a nice technical paint for use on the model’s base, such as Citadel’s Agrellan Earth or Martian Ironearth. These crack and flake as they dry, creating interesting effects and making your model even more awesome. Citadel has a rather large collection of technical and texture paints, so be sure to take a good look at the selection and pick the one you think would look best with your model.
Citadel also makes a huge variety of shade paints, which will add depth and character to your models. The Army Painter also has a nice collection, though they’re called washes. Pick one or two for your models. For anything that has some sort of metallic weapon, I like to use Citadel’s Nuln Oil shade. For earthier colors, such as fur or leather armor or brownstone buildings, go with Citadel’s Agrax Earthshade. For my project, I also used the Light and Dark washes from The Army Painter on the flesh (or bone) of my Dragonborn and Draugr Deathlord. Feel free to try out whatever you’d like, and the guys and gals at Game HQ can answer any questions you may have about shades and washes or technical paints.
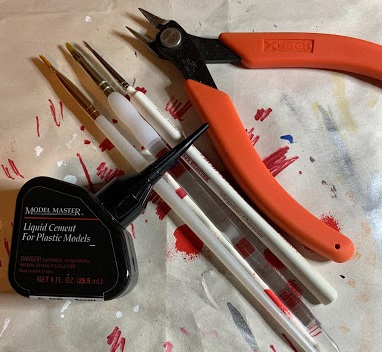
Lastly, if you didn’t get additional paintbrushes for our last project, you may want to go ahead and invest in a couple of different sized ones. For this project, I used three different brushes. A medium base brush was helpful for applying paints to the base. A character brush with a fine tip was excellent for detail work and small nooks and crannies. And the workhorse for this project was a size 2 round tip paintbrush I bought for painting ceramics from a local craft store. You can definitely skip the larger brush if you must, and the brush provided in Nolzur’s Marvelous Pigments paint kit will work fine as a detail brush. Just use your best judgment when deciding whether a second or third brush would be helpful. I certainly thought they were!
Oh, and make sure you have a pair of sprue clippers and some modeling glue! You’ll need them in the next step.
Step Three: Clean, Cut, Build, and Prime your models
We got to skip this part last time, as we used pre-built and pre-primed models. But now we’re leveling up, and that means we get to be a little more involved.
Start by cleaning the sprues that your models are on. This is pretty simple. Get a container large enough to hold your sprue and fill it with just enough warm (but not hot!) water to cover the model and a drop or two of dish soap. Drop your sprue in, give it a little splash to make sure it’s good and covered and let it chill for a few minutes. Then remove the sprue, rinse it, and allow it to dry. If you’re short on time, you can skip this step entirely without sacrificing quality.
Now it’s assembly time. If you’ve put together a piece of plywood furniture, you can build a model. Trust me. Just follow the directions provided, and be sure to only cut out the pieces needed for each step in the build process. Some models are small and only have three to five pieces. The instructions for these models may only be a single exploded view image. Some models will have several pieces and have many steps that cover a handful of pages.
Just go slowly, take your time, and trim each piece out of the sprue carefully. You can clean up your cuts with a small bit of sandpaper, but I’ve found that just going over the cut again with the sprue clippers is enough to get a smooth finish.
Dry fit the pieces together to ensure you’ve got the fit right before using any glue. You can use superglue if you’d like. It’s widely available and works well. But I prefer to use plastic cement. The drying time is slower, which allows for small shifts in the fit if you misalign pieces, and it doesn’t stick your fingers together as if your hands have just been hit by a Body Bind Curse.
You can put your model on a base at this point, or you can paint the model and base separately and combine them later. It’s completely up to you. I like to put the model on its base before painting, as it gives me a little extra to hold on to while I work.
Once everything is glued together, let your model rest for a bit to allow the glue to completely dry before moving on to the priming stage.
If you bought a paint-on primer, just paint it on with a large brush. Make sure to get all of the nooks and crannies of your model, but be careful not to apply the primer too thickly, as you’ll lose smaller details.
If you bought a spray-on primer, applying it is just like applying any other kind of spray paint. You can arrange the models on their side and give them a good spray, allow them to dry, then flip and apply primer to the opposite side to make sure you get complete coverage. Or, if you want to be super fancy, you can use a paint stirring stick and some mounting putty to make a priming wand. The mounting putty will hold the models in place on the paint stirrer while you rotate it around to get full coverage with your primer that way.
However you do it, make sure you find a nice balance between spotty coverage and primer that is too thick and has obscured your model’s finer details.
Step Four: Paint!
Whew, we made it!
I’ll skip the basic painting steps this time (after all, you’ve mastered those skills already, right?). Instead, I’ll just share the colors I used and the ‘not quite final’ photo for each of the two models I painted for this project. Afterward, I’ll cover applying shades and technical paints to really give your model that finished look.
For the Dragonborn model, I started with The Army Painter’s Barbarian flesh for the skin. Some Fur Brown and Leather Brown from The Army Painter went on her armor. Oak Brown from The Army Painter and Mithral Silver from my D&D paint set got the shield ready. The Mithral Silver also went on her sword and the metallic parts of her armor. I finished up by cleaning up her hair with a bit of D&D Abyssal Black and painting the horns of her helmet in Citadel’s Morghast Bone.
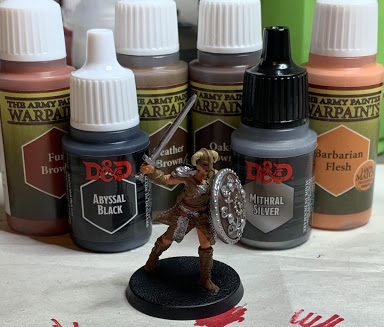
The Dragonborn looks fine after applying the base and layer paints.
But some shades and technical paints will really upgrade the final appearance.
And then things got really fun.
I ended up using three different shades/washes and two technical paints on this model before declaring her complete.
The important thing to remember about shades and washes is that a little will go a long way, and you have to be careful not to allow the paint to pool too much. The paint is very thin, so making sure it collects where it should without it getting stuck somewhere and creating an unsightly stain can be a bit tricky. I try to have only a very small amount of paint on my brush at any moment, and I work in batches across the miniature. Any spots that I feel have too much shade or wash, I can wipe it out and move it around with the mostly dry paintbrush before it dries.
Technical paints are a little different. You can apply a thick layer or a thin layer to get slightly different looks. They tend to be thicker and are easy to apply by just slapping them around a bit with your brush.
If you aren’t sure how a technical paint or a shade/wash will look, try testing it on a spare bit of sprue.
For the Dragonborn model, I used The Army Painter’s Soft Tone wash on her skin for a slight darkening and dirty look. Some Citadel Nuln Oil made her sword and shield and metallic armor pieces look used and slightly tarnished, and Citadel’s Agrax Earthshade made the leather armor and her helmet look worn. I am especially impressed with how the Agrax Earthshade made the horns on her helmet look spectacularly realistic.
I tried a new technical paint for this model. Citadel’s Blood for the Blood God gave her sword and shield a nice bloody slick, and it stayed glossy and bright after drying. Her shield looks like she just gave a bandit an excellent bash to the face, and I’m rather pleased with the look. Citadel’s Agrellan Earth gave the base she stands on the crusty look of dried earth, and with those final touches, I decided this Dragonborn model was battle-ready.
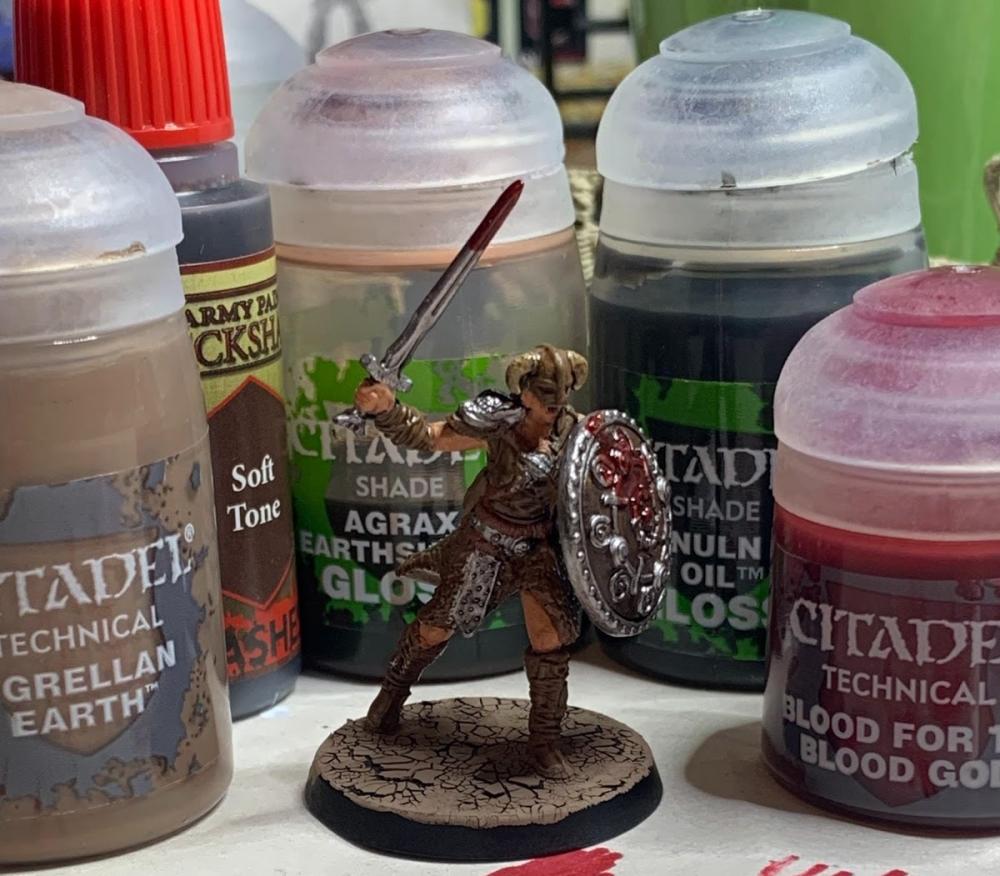
Look at the difference! Her weapons and armor are worn and used, and her helmet looks like it was actually made with goat horn. The blood on her sword and shield looks awesome!
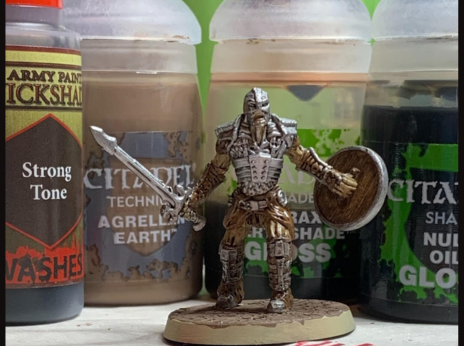
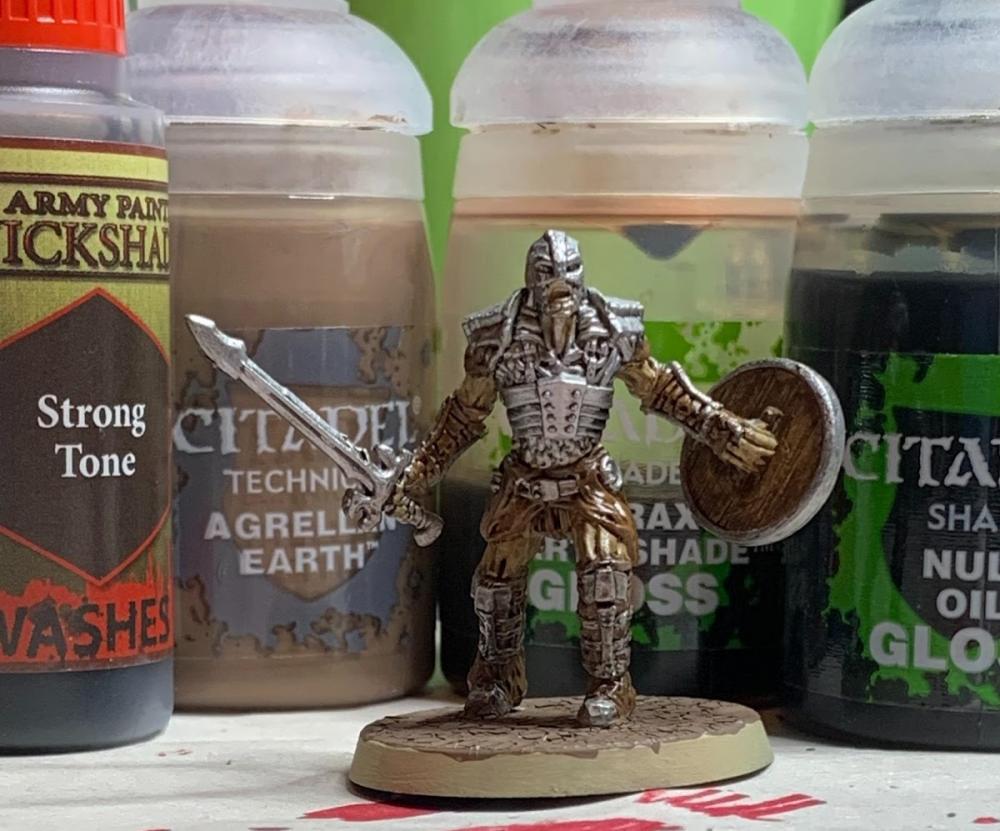
For the Draugr Deathlord, I used Citadel’s Morghast Bone for the flesh. Similar to the Dragonborn, I used both Fur Brown and Leather Brown for the armor and Oak Brown on the shield. For the metal, I used The Army Painter’s Plate Mail Metal. The basic paint job looks great, but we can definitely improve the look.

I used a similar shade technique for the Draugr Deathlord as I did for the Dragonborn. Citadel’s Nuln Oil went on the sword, shield, and armor. Some Agrax Earthshade tinted the leather armor nicely. Instead of Soft Tone for the flesh, I used Strong Tone to give it a decayed look over the pale base color. I covered the base in Agrellan Earth for a finishing touch.
I am very happy with the final results. The applied shades and washes gave each miniature a rugged and realistic look, and applying some technical paint to the bases transformed the boring black stand to something a little more lively. These miniatures are ready for my first foray into The Elder Scrolls: Call to Arms, and I’m excited to get some game time with them.
I hope this guide has helped you learn more about the world of miniature painting, and I wish you luck in your painting adventure. Now go forth, Padawan, and share your creations with the world! Get some models, get some paint, and get to work making something awesome.
Good luck and Game On!
Recent Posts
-
Finales Funkeln (The Final Spark)
 September 12, 2024
 -
Ready? Set? CRASH!
 August 22, 2024
 -
News - Our new look!
 August 9, 2024
 -
Gen Con 2024 no cap Recap
 August 8, 2024
 -
Cutthroat Caverns: The Best of Frenemies
 August 6, 2024